Logging to SD card
The Log4 device allows the logging of measurements onto a micro SD card. New .csv files are created at the beginning of every session. Before logging data on to the SD card, please make sure the SD Card is in FAT32 format.
Logging data on to SD card:
Make sure Log4 device is initially switched OFF.
Insert Micro SD card into MICRO SD slot (Ensure the SD card is facing label side down and insert it into the SD card slot until it clicks into place).
Press START/STOP button to turn on Log4 device.
A “S” symbol should occur at the top of the information bar next to time (Fig. 35).
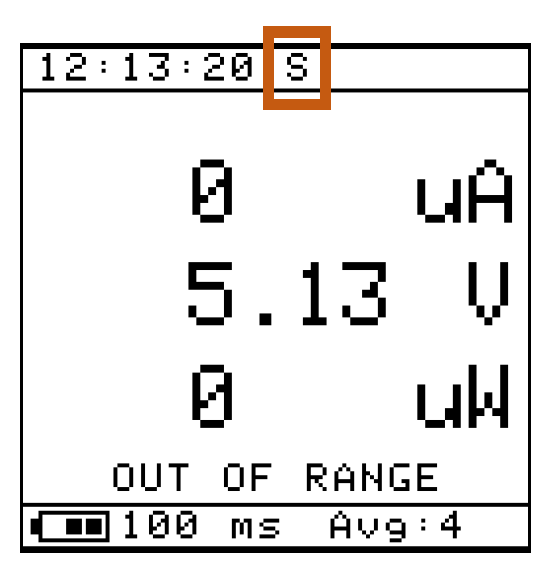
Fig. 35 Main screen with “S” symbol
“S” indicates the SD card is recognised but is not currently logging in any data. (If there isn’t a “S” symbol or if instead of “S” , there is a “U”, try reformatting the SD card again or simply try to turn the device OFF and ON again)
To commence logging data, the shortest method is to just press the START/STOP button once. The “S” symbol will change into “L”. This indicates the Log4 Device is currently logging data onto the SD Card.
To stop logging data, press START/STOP button once again. The “L” will change back to “S”.
The SD card can now be taken out or START/STOP button can be clicked again to log more information.
Alternatively, the SD card logging can be enabled/disabled by the Logging menu.
Press menu button for Settings page.
Scroll Navigation Wheel to Logging (Fig. 36) and press it to navigate to the sub menu (Fig. 37).
Press the Navigation Wheel to toggle SD card logging.
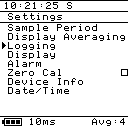
Fig. 36 Logging menu item selected on main menu
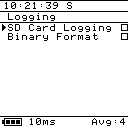
Fig. 37 Logging menu
Binary mode
To save space on the SD card, binary mode can be enabled which will save the log files as binary files rather than CSV files. These can be converted later to CSV files in the Log4.Desktop app. Binary mode is also required at very low sampling periods (less than 5 ms), and will be automatically enabled if these rates are selected. If binary mode is enabled and a higher sampling period is chosen, it will remain set and will need to be unset manually.
Binary mode is represented on the screen with the letter “B” (Fig. 38).
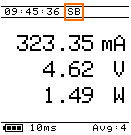
Fig. 38 Main screen with “B” symbol
To toggle binary logging, the following procedure is used.
Navigate to the Logging sub menu as shown in fig Fig. 36 and Fig. 37 above.
Scroll Navigation Wheel to Binary Format (Fig. 39).
Press the Navigation Wheel to toggle between binary format and CSV logging.
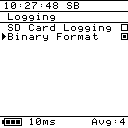
Fig. 39 Binary format menu option
Viewing Measurements on CSV files
Ensure there is no active logging session (An “S” should be shown at the top of the screen instead of “L”)
Eject Micro SD from Log4 Device.
Put Micro SD into Micro SD Card adapter and then insert the SD card into SD slot of your computer.
A CSV file labelled
log_<sample period>_YYYY-MM-DD_hh_mm_ss.csvshould be seen in the SD card drive.Open up the latest CSV file
log_<sample period>_YYYY-MM-DD_hh_mm_ss.csv
For a sufficiently long logging period, multiple files will be used. These files will be named with the timestamp of the first sample in that file.
The measurement data is split into 4 columns starting from left to right (Fig. 40).

Fig. 40 A sample CSV file with measurement data